
Introduction
You've held a saddle-stitched booklet more times than you can count. Church programs, product catalogs, employee handbooks, comic books, that glossy magazine in your dentist's waiting room.
Most people never learn the name of the binding method holding those pages together, yet it's the most common finishing technique in commercial printing.
"Fold and staple" sounds almost too simple to mess up.
But the difference between a booklet that lies flat and looks polished versus one that bows open or has clipped text near the edges comes down to math you can't skip: page count, paper weight, and design allowances.
This tutorial walks through the exact production process, what you need to prepare before sending files to print, the variables that determine quality, and the mistakes that trip up even experienced designers.
TL;DR
- Saddle stitching staples folded, nested sheets through the spine for affordable booklets
- Works best for 8 to 64 page projects that need to lie flat when opened
- Page count must always be a multiple of 4, no exceptions
- Paper weight and page count together determine whether your booklet lies flat or bows
- Watch for creep on high page-count jobs; perfect binding may work better
How Saddle Stitch Binding Works: Step-by-Step
Understanding the actual production sequence helps you design smarter files from the start. Here's what happens between file submission and finished booklet.
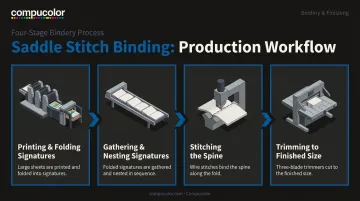
Step 1: Printing and Folding the Signatures
Pages typically print on large parent sheets, such as an 11" x 17" sheet that folds down to a standard 8.5" x 11" page. Once printed, sheets run through a folder machine set to the project's exact fold size.
A few production notes worth knowing:
- Cover stock thickness decides whether covers run through the folder with interior pages or get folded separately
- Knife folds apply heavy, precise pressure to create a crisp spine crease, since a sloppy fold throws off everything downstream
- Paper grain direction affects the crease too; folds parallel to the grain stay cleaner and resist cracking
Step 2: Gathering and Nesting the Signatures
A gathering machine organizes folded signatures into the correct reading order, nesting each one inside the next like a set of folded booklets stacked together.
Signatures are printed with a slightly longer edge on one side. This small lap, sometimes just a few millimeters, gives the gathering machine's grippers something to catch so each signature opens automatically to its centerfold as it moves down the line.
Step 3: Stitching the Spine
The nested publication travels along a conveyor with its spine facing up and the pages hanging over either side, resembling legs draped over a saddle. That image is where the binding gets its name.
A stitching head pushes wire from a spool through the outside of the spine fold, then clinches it flat on the inside to form the staple. Most standard equipment uses two staples per booklet, though wider publications sometimes need additional stitches for stability. On lines like Compucolor's Mueller Martini bindery equipment, this entire step takes a fraction of a second per booklet before feeding straight into the trimmer.
Step 4: Trimming to Finished Size
The stitched piece moves to a three-knife trimmer, which cuts the head, foot, and face (front) edges in a single pass. This step squares up the booklet, removing the signature lap and any uneven edges left from folding and gathering. What's left is a clean, flush finish on all three open sides.
What You Need Before Saddle Stitch Binding Your Project
Getting your file setup and material choices right before you hit "submit" prevents costly reprints and delays at the bindery. Here's your pre-flight checklist:
- Confirm total page count is a multiple of 4, including front and back covers. Adjust your design rather than leaving an unplanned blank page if your count lands on an odd number
- Choose paper weight based on page count. Heavier stock on high page-count booklets increases the risk of bowing and uneven trimming
- Add creep allowance on projects over 40 pages. Keep page numbers and key text away from the outer edge, since inner sheets shift as the booklet builds
- Verify your printer's equipment capacity. Duplo's 700i digital booklet system handles up to 50 sheets, while smaller systems cap out around 25
- Work with a print partner that reviews files pre-production. Compucolor's online submission process flags page-count or margin issues before a job hits the press
Common Mistakes and Troubleshooting Tips
Most saddle stitch problems trace back to a handful of preventable errors. Watch for these:
- Page counts not divisible by 4 — the most common mistake, forcing blank pages or last-minute file rework
- Ignoring creep allowance on higher page-count booklets, which clips text or page numbers near the trim edge during final cutting
- Choosing paper too heavy for the page count, causing the booklet to bow, spring open, or trim unevenly instead of lying flat
- Placing critical content too close to the spine or trim edges without accounting for how the fold-and-trim process shifts margins
Fiery's imposition documentation notes that creep shifts content incrementally as folded sheets accumulate, which is exactly why margin planning matters more as page count climbs. Compucolor's prepress team checks page count, margins, and paper weight before a job goes to press, catching most of these issues early.
When to Use Saddle Stitch Binding vs. Alternatives
Choosing the right binding method depends on page count, budget, durability needs, and how the finished piece needs to look and function.
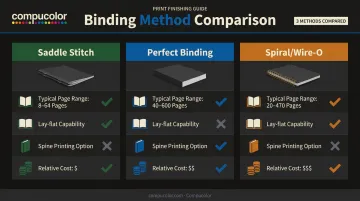
Saddle stitching is the go-to choice for programs, newsletters, catalogs, comic books, and manuals that need to lie flat when opened. It's also lighter and cheaper to ship in bulk than perfect-bound alternatives, which matters for long-distance or high-quantity runs.
That said, saddle stitching gets risky once a project exceeds roughly 0.25 inches in thickness or climbs past 64 to 92 pages. Beyond that range, pages can bow at the spine and staples may loosen with heavy handling over time.
Saddle Stitch vs. Perfect Binding
When perfect binding is better:
- Handles higher page counts that would strain a saddle stitcher
- Requires a printed spine for retail shelf display
- Delivers a more premium, book-like finished feel
Key trade-offs: Perfect binding typically costs more and takes longer to produce because of the gluing process, and the finished book won't lie fully flat when opened.
Other Alternatives: Spiral or Wire-O Binding
When it's better: Projects that need a full 360-degree, lay-flat function, such as workbooks, cookbooks, or training manuals people need open on a table. GBC confirms that WireBind pages lie flat and rotate a full 360 degrees, something a stitched spine simply can't replicate.
Key trade-offs: Less of a traditional "booklet" appearance, and generally a higher per-unit cost than stitching.
If you're weighing page count against budget and intended use, a quick conversation before committing to a format can save costly reprints. Compucolor's team regularly helps businesses nationwide choose the right binding method for catalogs, direct mail pieces, and marketing collateral, so projects don't get built around the wrong finishing process.
Conclusion
Saddle stitch binding delivers a fast, professional finish at an affordable price, but only when page count, paper weight, and creep are planned correctly from the start. Most quality problems don't come from the stitching machine itself. They come from skipped page-count math or ignored creep allowance during the design phase.
Ready to bind your next booklet, catalog, or program the right way? Submit your files or request a quote from Compucolor, and get guidance on binding method, turnaround, and pricing before you commit to a print run.
Frequently Asked Questions
What is saddle stitched binding?
It's a binding method where folded, nested sheets get stapled through the spine fold. You'll see it on booklets, magazines, catalogs, and programs across the print industry.
Is saddle stitched binding cheaper than perfect binding?
Yes, generally. Saddle stitching skips gluing and extra production steps, keeping costs lower. Exact savings depend on your quantity and total page count.
How many pages can you saddle stitch?
The typical range runs from 8 to 64 pages, sometimes up to around 92 with thinner stock. Page count must always land on a multiple of 4.
What is page creep in saddle stitching?
Creep is the gradual edge protrusion of inner pages as a booklet's page count grows. It requires design allowances near the trim edge so content doesn't get clipped.
Can you print on the spine of a saddle-stitched book?
No. Saddle stitching leaves a folded spine rather than a flat surface, so there's no room for spine printing. Perfect binding is your option if you need that feature.
What's the difference between saddle stitching and spiral or Wire-O binding?
Spiral and Wire-O allow a full 360-degree flat opening, which is great for workbooks and manuals. Saddle stitching keeps the more traditional, polished booklet look but doesn't open as fully.